Official Luthiers Forum! http://www-.luthiersforum.com/forum/ |
|
Rosette and purfling http://www-.luthiersforum.com/forum/viewtopic.php?f=10102&t=8246 |
Page 1 of 1 |
Author: | BobK [ Thu Aug 31, 2006 9:47 pm ] |
Post subject: | |
My first attempt at a segmented wooden rosette and rope purfling. The rosette is maple burl. The purfling is maple as well and is my first attempt at dying wood. After soaking it in alcohol dye for a number of days I still wasn't getting even penetration throughout the 1/16 thick slices. I ended up putting them in a bottle and using a hand vacuum pump that was made to preserve opened wine. I was afraid to use my electric vacuum with an alcohol dye. One mistake I did make was when I glued all the segments together into the final strip. I let the strip sit unclamped with only one side with the black veneer. The next morning I had a 36 inch long "U" instead of a flat strip. Luckily I had enough stock to make another. Thanks for looking, and thanks for all the inspiration. Bob K |
Author: | Serge Poirier [ Thu Aug 31, 2006 10:21 pm ] |
Post subject: | |
That is a very nice rosette Bob!!! ![]() Serge |
Author: | Mark Tripp [ Thu Aug 31, 2006 10:31 pm ] |
Post subject: | |
First attempt?! Could have fooled me! Nice work Bob! -Mark |
Author: | Sam Price [ Thu Aug 31, 2006 11:42 pm ] |
Post subject: | |
Beautiful!! |
Author: | Dave Rector [ Fri Sep 01, 2006 12:14 am ] |
Post subject: | |
Very nice Bob! Sure doesn't look like a first effort to me. ![]() |
Author: | Cocephus [ Fri Sep 01, 2006 12:45 am ] |
Post subject: | |
Looks great, Bob. Making that purfling is a blast, ain`t it? ![]() |
Author: | Bill Greene [ Fri Sep 01, 2006 12:48 am ] |
Post subject: | |
That's the first effort? Whoa. Impressive. |
Author: | Don Williams [ Fri Sep 01, 2006 1:07 am ] |
Post subject: | |
Very very nice....I like it. I think I could only do that if I had a cnc....... ![]() ![]() |
Author: | CarltonM [ Fri Sep 01, 2006 2:03 am ] |
Post subject: | |
Lookin' good, Bob! Be sure to let us see it when it's all done (or even sooner!). |
Author: | JBreault [ Fri Sep 01, 2006 2:23 am ] |
Post subject: | |
Neat! Nice work Bob. I am really impressed. ![]() |
Author: | MSpencer [ Fri Sep 01, 2006 5:27 am ] |
Post subject: | |
Looks great, I really like the Rope purflings, nice work. Mike White Oak, Texas |
Author: | Jeanne [ Fri Sep 01, 2006 5:44 am ] |
Post subject: | |
Very nice work Bob! ![]() ![]() ![]() I really like the effect - stain-glass like! ![]() WOW - thanks Bob...that just gave me an idea for a custom rosette for my draft journal! |
Author: | Wade Sylvester [ Fri Sep 01, 2006 6:02 am ] |
Post subject: | |
Real nice Rosette Bob! Gotta love that burl! Is the burl going somewhere elce in the build too? I've never tryed rope purfling. It looks like a bear of a job to tackle. speaking of bear, that's a nice top you have there! Wade |
Author: | Mike Collins [ Fri Sep 01, 2006 6:46 am ] |
Post subject: | |
Great work Bob! You should be proud! Is that a Vikwood top? it looks familiar ! mike www.collinsguitars.com |
Author: | Kelby [ Fri Sep 01, 2006 7:33 am ] |
Post subject: | |
Bob, that's really beautiful. In fact, you inspired me to take off work early this afternoon to run down to Austin Hardwoods and pick up some wood to try my first segmented rosette. Thanks! One thing I like about your rosette is the way you use the black/blue/black lines between each segment, but have the lines flow into the outer black/blue/black purfling lines. Although I can think of ways to do that, they would all involve building the entire rosette at once and inlaying it all together. Did you inlay the entire rosette at once? |
Author: | BobK [ Fri Sep 01, 2006 8:08 am ] |
Post subject: | |
Wow. ![]() ![]() Coe, I had just started cutting the pieces for the rope when you posted pics of your finished guitar. After you said it was a pain I was expecting the worst, so actually doing it didn't seem that bad. Just time consuming. One thing I learned was that next time I need to leave enough raw material to perfectly square up the blank. That makes it much easier to piece the long strip together. Wade, After seeing the link about wood pickguards I thought about making one from the burl, but that might be a little over the top for me. Tuner knobs? I've never tried that. Any other possibilities?? Mike, I've had the top for a while, it came from Alaska TW. First time I've worked with bear claw. I don't know if there's supposed to be a difference, but it seems tougher than regular sitka. "Thanks" again to everyone for the compliments. It's great motivation to spend some time working on a bridge Bob K |
Author: | BobK [ Fri Sep 01, 2006 9:27 am ] |
Post subject: | |
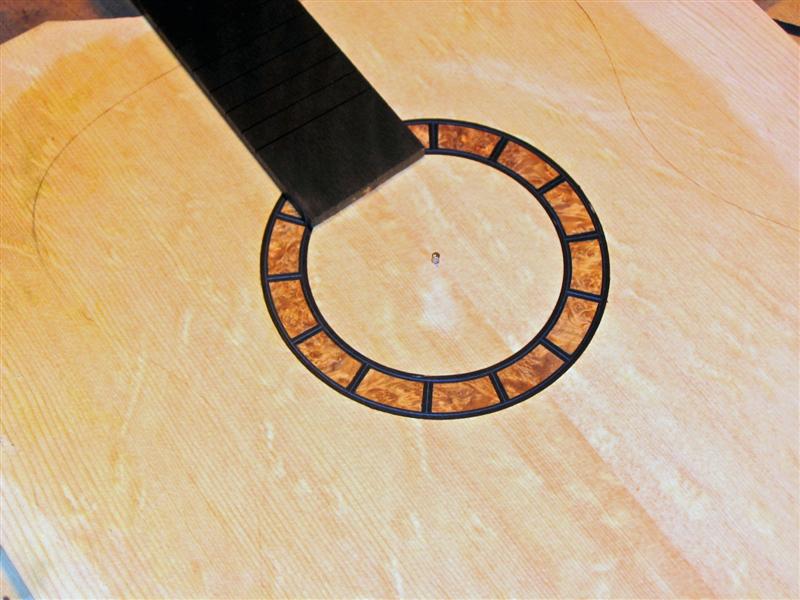
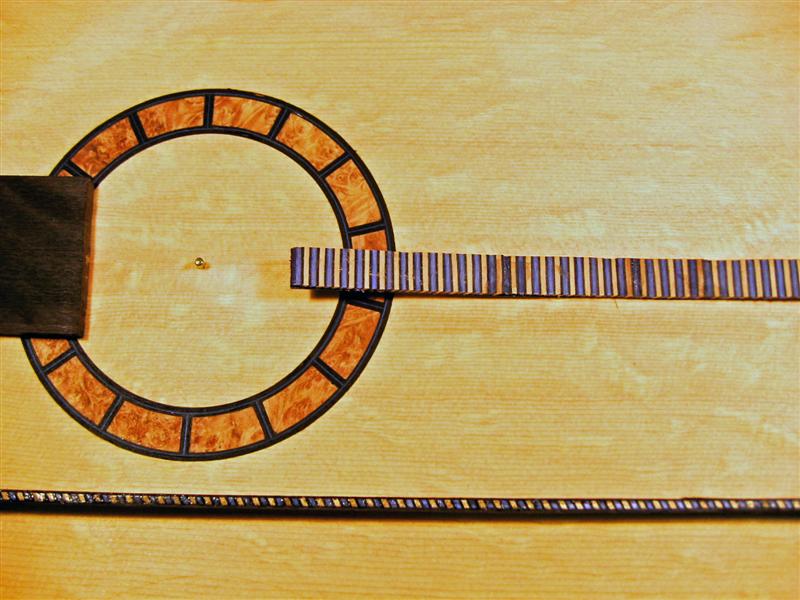
Kelby, it took me a while to figure that out too. There are probably easier ways, but here's how I did it. I cut the ring blank, routed the top to accept the ring and dry fit the blank. Now the tricky part, for me anyway. Then I got out my pencil, ruler, compass, angle gauge and anything else I could think of to help me figure out the actual segment layout. In the end I eyeballed it, took the ring out of the top and numbered and cut all the segments at the point where the blue line separates them. I then used a sandpaper block to make sure that all the segments were identical. Then I trimmed the width of my black divider line off of the end of each segment, otherwise the segment angles won't line up. Dry fit everything including the black and blue dividers. Once happy with the fit I took everything out and sprayed the top with shellac as I used CA glue in part of the process. Then I white glued in the segment that fits at 6:00. Here's where someone else might have a better solution. Put in the black and blue lines as spacers only - no glue, then glue in the next segment. Continue around the rosette making sure that the segments are as tight as possible. Take out the spacers and let the glue dry. Then get out the router and make the grooves for the black and blue rings. I made the grooves the total width of all of my rings. It makes the next step harder, but the later steps are easier. CA glue in the two black rings that touch the rosette segments. Chisel out the part of the rings that don't frame the segments. Insert the the black and blue dividers making sure they extend to at least the outside edge of the black ring. You may have to cut new ones depending on where you placed your rings. Glue them in and route off the overlap. Install the blue and last black rings and follow that with a CA bath. Hope that helps and sorry for the wordy reply. Bob K |
Author: | Andy Zimmerman [ Sat Sep 02, 2006 1:49 pm ] |
Post subject: | |
Absolutely beautiful rosette!!!! |
Page 1 of 1 | All times are UTC - 5 hours |
Powered by phpBB® Forum Software © phpBB Group http://www.phpbb.com/ |